> For the complete documentation index, see [llms.txt](https://docs.gta.clothing/llms.txt). Markdown versions of documentation pages are available by appending `.md` to page URLs; this page is available as [Markdown](https://docs.gta.clothing/cloth-modding/vertex-colors.md).

# Vertex Colors

## Introduction

Vertex Colors are important for clothing because ped materials can use them for lighting, sweat, wind and other effects. Most Freemode clothing references use two vertex color attributes.

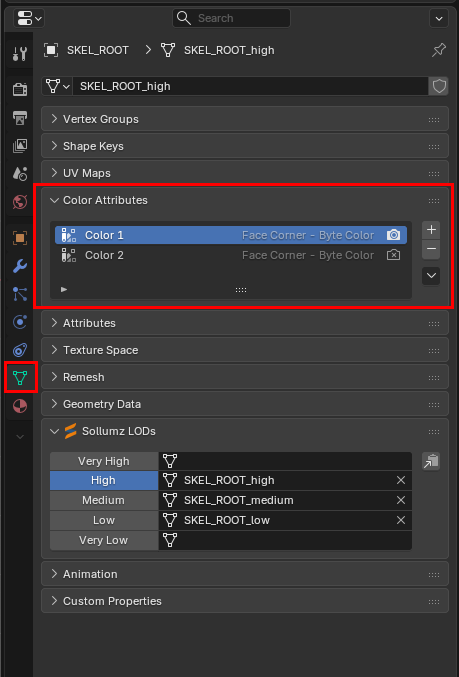
Current Sollumz versions name these attributes `Color 1` and `Color 2`. Older tutorials and tools may describe the same two channels as `colour0` and `colour1`. You can find them in the Color Attributes panel in Object Data Properties. For an ordinary Freemode ped material, Color 1 is commonly orange and Color 2 is commonly black with zero alpha. Special materials and intentional wind, sweat or emissive behavior may need different values.

<figure><img src="/files/fk6qdmwAqEhuUrjSYwXK" alt="Blender Object Data Properties with the Color Attributes panel and its Color 1 and Color 2 entries highlighted"><figcaption><p>Color 1 and Color 2 in Object Data Properties.</p></figcaption></figure>

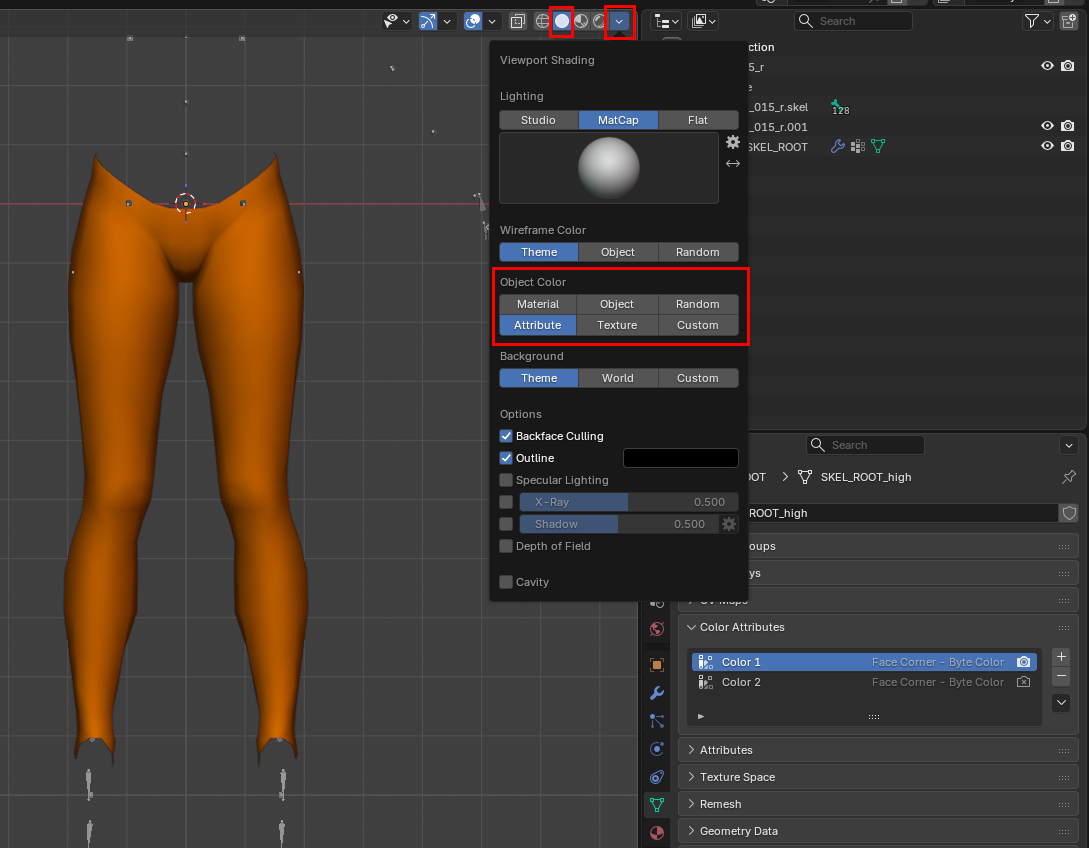
There are two ways to see these colors on the model. The first is to switch to Vertex Paint mode. The second is to open the Viewport Shading settings and set `Color` to `Attribute` while using solid shading.

<figure><img src="/files/wJ7GpfLYW4q91ZaPvL6z" alt="Blender solid Viewport Shading settings with Object Color set to Attribute"><figcaption><p>Set Object Color to Attribute to preview the active color attribute in solid shading.</p></figcaption></figure>

Once you are previewing the colors, selecting Color 1 or Color 2 from the Color Attributes panel will switch your active view between them.

## Painting new vertex colors <a href="#painting-new-vertex-colors" id="painting-new-vertex-colors"></a>

For an ordinary Freemode clothing material, orange `#FF8000` for Color 1 and black `#000000` with zero alpha for Color 2 are good starting values. If you are matching an existing special material, copy its attributes instead. The following steps add the normal starting preset to a model.

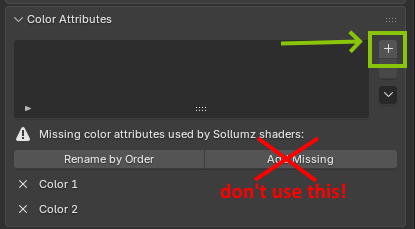
In the Color Attributes panel, click the `+` button.

<figure><img src="/files/GeDXreNStgB2oLzhpdIF" alt="Blender Color Attributes panel with the plus button highlighted and Add Missing crossed out"><figcaption><p>Use the + button to create the attributes manually.</p></figcaption></figure>

{% hint style="warning" %}
Sollumz's **Missing color attributes used by Sollumz shaders** warning is useful, but do not use **Add Missing** for this clothing workflow. When an attribute is absent, the button creates it with the required name and format, but it does not assign the appropriate clothing color. Add each attribute with the `+` button and set its color manually.
{% endhint %}

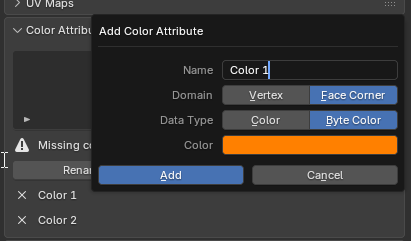
Set `Name` to `Color 1`, `Domain` to `Face Corner`, and `Data Type` to `Byte Color`. Then click the `Color` box.

<figure><img src="/files/yhJC4TLZgJO2oKD7IW7d" alt="Blender Add Color Attribute dialog configured for Color 1 with Face Corner and Byte Color"><figcaption><p>Create Color 1 as Face Corner and Byte Color.</p></figcaption></figure>

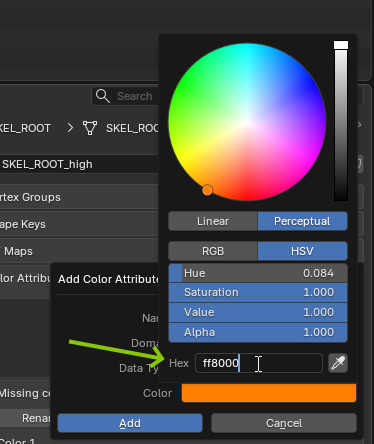
Enter `FF8000` in the `Hex` field and leave `Alpha` at `1.000`. The color should turn orange. Then click `Add`. When creating attributes manually, use the values from a comparable working item if its alpha differs from this basic preset.

<figure><img src="/files/MoOefzJEq62rWOyYH2RH" alt="Blender color picker with the Hex field set to FF8000 and Alpha set to 1"><figcaption><p>Set the normal Color 1 value to FF8000 with full alpha.</p></figcaption></figure>

### Add Color 2 <a href="#add-color-2" id="add-color-2"></a>

Click the `+` button again to add the second color attribute.

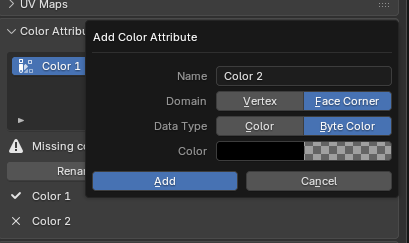
Set `Name` to `Color 2`, `Domain` to `Face Corner`, and `Data Type` to `Byte Color`. Then click the `Color` box.

<figure><img src="/files/zbcWd6xs18jKx3RqsLij" alt="Blender Add Color Attribute dialog configured for Color 2 with Face Corner and Byte Color"><figcaption><p>Create Color 2 as Face Corner and Byte Color.</p></figcaption></figure>

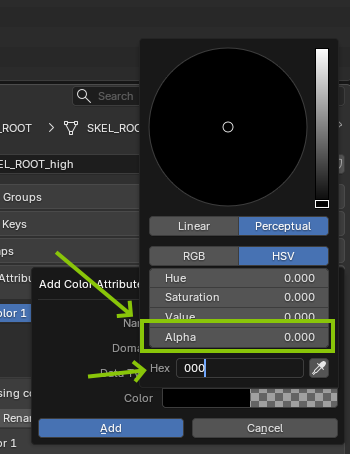
Enter `000000` in the `Hex` field and **set `Alpha` to `0.000`** for this ordinary no-sweat/no-wind preset. Then click `Add`. Intentional sweat and wind effects are more advanced and should be copied from a working reference that uses the same ped material.

<figure><img src="/files/iSkSkK9TUifBZIGXSi4o" alt="Blender color picker with the Hex field set to black and Alpha set to 0"><figcaption><p>Set the normal Color 2 value to black with zero alpha.</p></figcaption></figure>

The normal starting preset is now complete. See the [Sollumz Basic Clothes Editing FAQ](https://docs.sollumz.org/tutorials/basic-clothes-editing#faq) for visual examples and common vertex-color symptoms.

## Emissive Clothing <a href="#emissive-clothing" id="emissive-clothing"></a>

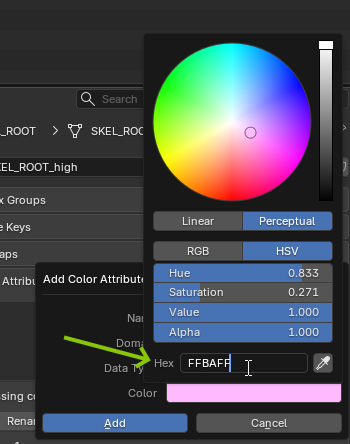
If you are using a working ped emissive material, the glowing areas commonly use pink `#FFBAFF` in Color 1 instead of orange. Keep Color 2 black with zero alpha unless a comparable working reference intentionally uses wind or sweat. The vertex color does not turn a normal material into an emissive one by itself; the material and shader must also support the effect.

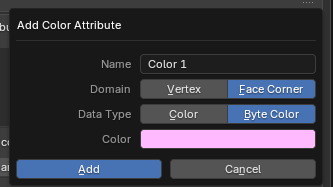
If every face on a new mesh should use the ped emissive color, click the `+` button and create `Color 1` with `Face Corner` as the domain and `Byte Color` as the data type. Then click the `Color` box.

<figure><img src="/files/eoOYjaJDJTUq0G3JMyJT" alt="Blender Add Color Attribute dialog configured for an emissive Color 1 attribute"><figcaption><p>Create the emissive Color 1 attribute as Face Corner and Byte Color.</p></figcaption></figure>

Enter `FFBAFF` in the `Hex` field, leave `Alpha` at `1.000`, and click `Add`.

<figure><img src="/files/0Iryae96GPAxtO8br4Sr" alt="Blender color picker with the Hex field set to FFBAFF and Alpha set to 1"><figcaption><p>Set ped emissive Color 1 to FFBAFF with full alpha.</p></figcaption></figure>

If the mesh already has `Color 1`, do not create a second attribute. Select the existing attribute and use Vertex Paint to apply pink only where needed.

**Only paint the parts you want to glow in-game pink.** Select those faces or face corners, paint their Color 1 values pink, and leave the rest of the mesh on the normal orange/black setup. Separating the glowing area into another mesh is optional and only needed when the material or hierarchy requires it.

Here is a cube painted as an example.

<figure><img src="https://maneki-neko-1.gitbook.io/~gitbook/image?url=https%3A%2F%2F970011517-files.gitbook.io%2F%7E%2Ffiles%2Fv0%2Fb%2Fgitbook-x-prod.appspot.com%2Fo%2Fspaces%252FzlVJDcNwypyuPEqM4G8Q%252Fuploads%252FntYUpuHidGQxZDK3CTWy%252Fimage.png%3Falt%3Dmedia%26token%3D9a4fa34c-70fa-44e4-bd7f-ecdbaef6400a&#x26;width=768&#x26;dpr=4&#x26;quality=100&#x26;sign=f5f07992&#x26;sv=1" alt=""><figcaption></figcaption></figure>

In this example, the pink portions were separated for convenience. The material and Color 1 values control the effect, not the separation itself.

<figure><img src="https://maneki-neko-1.gitbook.io/~gitbook/image?url=https%3A%2F%2F970011517-files.gitbook.io%2F%7E%2Ffiles%2Fv0%2Fb%2Fgitbook-x-prod.appspot.com%2Fo%2Fspaces%252FzlVJDcNwypyuPEqM4G8Q%252Fuploads%252FFPx1lPb5ayjw7nTF3jkA%252Fimage.png%3Falt%3Dmedia%26token%3D378699e5-7148-4a5b-97d4-cfe5d2eeb9a8&#x26;width=768&#x26;dpr=4&#x26;quality=100&#x26;sign=c5dd211f&#x26;sv=1" alt=""><figcaption></figcaption></figure>

The rest stays orange.

<figure><img src="https://maneki-neko-1.gitbook.io/~gitbook/image?url=https%3A%2F%2F970011517-files.gitbook.io%2F%7E%2Ffiles%2Fv0%2Fb%2Fgitbook-x-prod.appspot.com%2Fo%2Fspaces%252FzlVJDcNwypyuPEqM4G8Q%252Fuploads%252FEPwuJsM4e2uBnuRFdDbF%252Fimage.png%3Falt%3Dmedia%26token%3D0f715775-4154-42d8-a5ea-70a27e36649e&#x26;width=768&#x26;dpr=4&#x26;quality=100&#x26;sign=74ad3de&#x26;sv=1" alt=""><figcaption></figcaption></figure>